|
A walk through the
Attrezzo interface
14 March 2002
Table of Contents
Introduction
Purpose
Overview
The components
of the user interface
Manipulating Xindice server
locations
Adding a new server
location
Modifying the
parameters of an existing server location
Removing a server
location
Refreshing the
Navigator View
Importing
and exporting data
Importing
data into an Xindice repository
Exporting
data from an Xindice repository
Manipulating Xindice
resources
Creating a new
collection
Creating a new document
Editing a document
Deleting a collection
or a document
Introduction
Purpose
This
document provides a brief description of Attrezzo per Xindice. We present screen shots for each one
of the major screens and dialogs and a we provide a walk through the essential
functionality.
Overview
First of all we describe the main
components of Attrezzo in section The components of the user
interface. We then describe functionality and user interaction in the ensuing
sections, particularly how to define, modify and remove Xindice server locations
(section Manipulating Xindice server
locations), how to import and export data
to/from an Xindice repository (section Importing and exporting
data) and how to
manipulate and manage Xindice resources (section Manipulating Xindice
resources).
The components of the user
interface
Attrezzo's user interface is based on the Eclipse
platform, to which it provides an extension. It is built as a plugin to Eclipse,
with its own perspective, views and wizards. It requires the plugins that are
core to the Eclipse platform plus the SolarEclipse Web UI plugin and the Nox
Logger plugin.
If you do not yet know Eclipse, please take the time to
familiarize yourself with the platform, its concepts and its idioms. You can
find all the relevant information at http://www.eclipse.org.
The fundamental part of the interface is represented by the
Attrezzo Perspective, which is shown in figure
1.
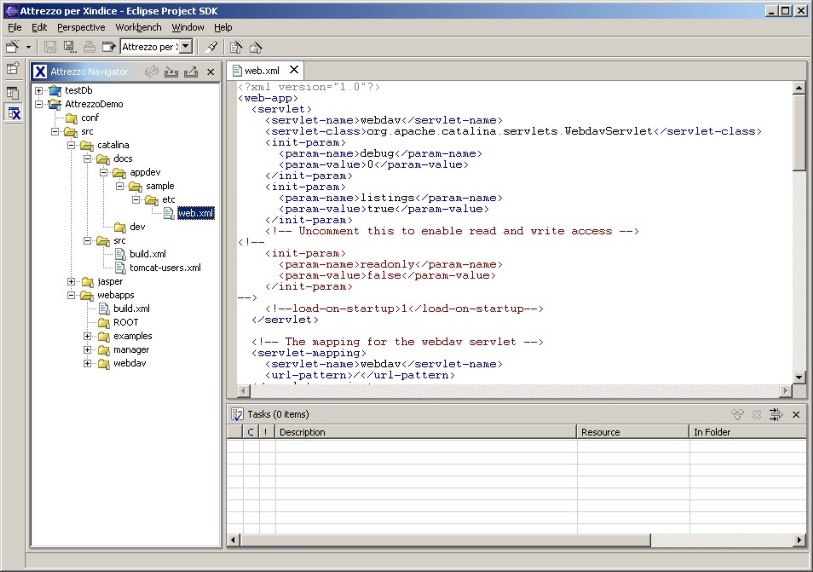
Figure 1: The Attrezzo Perspective |
The perspective contains three main areas:
-
on the left hand side the Attrezzo Navigator View,
which shows the contents of all Xindice servers that have been added to the
system. The representation is that of a hierarchical tree. It is used to browse through the
available Xindice resources and activate actions via both a context menu and
the view specific buttons located on the view's toolbar;
-
On the top right the Editor, which is an extension of
the XML Editor
provided by the Web UI Plugin and is used to modify the contents of any
Xindice document. The Editor can have as many documents open simultaneously
as the user wishes, and these are represented as separate tabs, one for each
document. The figure only shows one document open.
-
On the bottom right, the Tasks view, which is a conventional Eclipse
view. The Tasks
View is used to maintain a list of tasks to be performed, along with their
priority and completion state. As in
all Eclipse views, functionality is enabled via a context menu and the view
specific buttons located on the view's toolbar.
When the Attrezzo Perspective is open, it also contributes
two application specific buttons to the main Eclipse toolbar (the two last buttons
shown in the figure) for the creation of
new Xindice resources (documents and collections). It is to be noted that these
creation actions are also triggered from other UI elements, as described in
section Manipulating Xindice
resources.
Access to functionality is provided via the two toolbar
buttons already mentioned, via view specific buttons located on the Attrezzo Navigator's toolbar, via items in the menus
and/or wizards on the main toolbar and,
finally, via the context menus in the various views. The context menus are
provided with an enable/disable mechanism that enables or disables menu items
depending upon the nature of the current selection. Finally wizards are utilized
to provide a great deal of the functionality.
Given the nature of the Eclipse framework, further
functionality in future releases of Attrezzo will be added via the
creation of further views and, possibly, perspectives.
Manipulating Xindice server
locations
In order to work with Xindice
resources, the user needs to specify their location to enable the system to
connect to them. All servers that have been specified in this way are shown in
the Attrezzo Navigator as indicated in figure
1. The following sections
describe how to define the location parameters for a new server, how to modify
them after the server location has been added to the system and how to remove an
existing server location when it is no longer needed.
Adding a new
server location
In order to work with Xindice
resources, the user needs to first of all specify the location of at least one
Xindice server. She does this by utilizing either the Eclipse's New Wizard
button (the first button on the main toolbar) or the "New" item in the
"File" menu on the main menu bar. When she picks "New -->
Other --> Attrezzo per Xindice --> Xindice Server Location" from one of the two widgets, the New
Xindice Server Location Wizard represented in figure
2
is displayed.
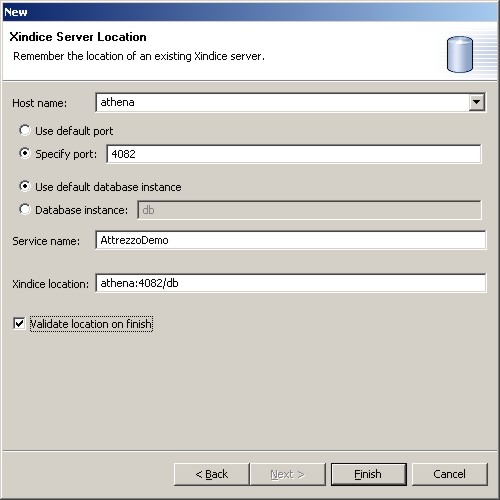
Figure 2: The New Xindice Server Location Wizard |
The Wizard enables the user to
enter all configuration parameters that are essential to open a connection to
the Xindice server. The user can enter the parameters in one of two ways:
-
by entering the full
location string in the "Xindice location" text field. In this case
the system analyzes the string, separates out the various components and
automatically fills in the other fields;
-
by entering the parameters
separately in the various fields (host, port, etc.). In this case the "Xindice
location" field will automatically update, as the user types
information into the other fields, to show the location string composed from
the various parameters.
The user can choose default
values where appropriate. She must also define an alias name for the service
in the "Service name" field. Finally, the "Validate location on
finish" checkbox enables choosing between the following two options:
-
immediate connection to the
server and validation of the parameters that have been entered
-
deferral of
this validation to a later time, when the user attempts to access the server's
data.
The wizard provides live
feedback in the white area just below the title. This feedback is in the form of
either appropriate information or error notification when one of the parameters
entered fails validation. The "Finish" button is enabled only when the
minimal amount of information that is needed to compose a complete and
meaningful location string is entered.
Once the user presses the
"Finish" button, an Attrezzo perspective, updated with the server just
added, is opened and displayed. If the user already had an Attrezzo perspective
open, it is brought to the foreground as the currently active perspective.
Modifying
the parameters of an existing server location
The user can edit and modify the
parameters of a previously defined server location by selecting a server in the
Attrezzo Navigator and clicking on the "Properties" menu item in
the context menu. This action brings up the New Server Location wizard shown in
figure 2, with all of the form fields
appropriately filled in and modifiable.
Removing a server
location
The removal of an existing
Xindice server location is very straightforward. It is sufficient to select one
of the servers shown in the Attrezzo Navigator and use the
"Remove location" menu item located in the view's context menu. More than one location can be
removed in a single action.
Refreshing
the Navigator View
The changes that you make during
the session are stored in the database as you you save your work. However, if
changes are being made to the database at the same time from other sources, you
will not automatically see those changes. Therefore, it is useful, and indeed
advisable, that you obtain a fresh and up to date view of the server at
reasonable time intervals. This can be done by pressing the "Refresh"
button located on the Navigator's toolbar (it is the very first button in the
toolbar). The length of time between refreshes is dependent on the usage of the
database.
Importing and exporting data
The interface permits data to be
imported from the file system into an Xindice repository and, conversely, to be
exported from the repository to the file system. This is done via wizards, which are described in the sections the follow.
Importing
data into an Xindice repository
This functionality can be
accessed by either clicking on the "Import" button on the Attrezzo Navigator
toolbar or selecting the "Import" menu item in the
"File" menu on the main menu bar. The wizard that is displayed is the one shown in figure
3.
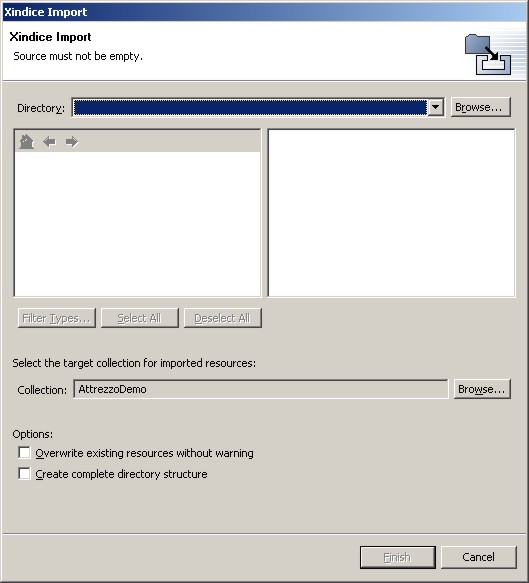
Figure
3: The Attrezzo Import Wizard initially |
Both Directory and Collection fields
are filled in by using the "Browse" button on their right. The
Directory field also keeps
memory of past selections; its history can be accessed by pulling down the
field. The initial text in the Collection field will show the Xindice element
that was selected in the Navigator View at the time the Import Wizard was
instantiated. The dialogs that are displayed when the two Browse buttons
are pressed are shown in figure 4 and figure
5
for the "Directory" and the "Collection" field respectively.
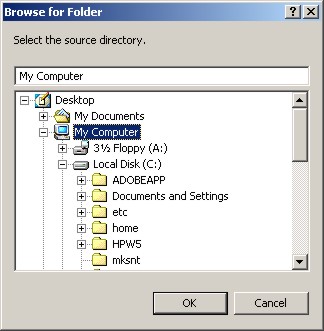
Figure 4: The source Directory dialog for
the Import Wizard |
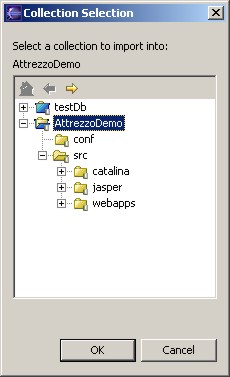
Figure 5: The target Collection dialog
for the Import Wizard |
Let's first look at the
Directory dialog in figure 4. This is a
standard Eclipse Directory dialog, in which the name of the desired directory
can either be filled in directly in the top text field or picked by selecting a
node in the hierarchical view. The directory that is picked represents the root
directory from which the the left hand side box of the wizard will be filled in
(see figure 6). The Collection dialog, shown
in figure 5, is a filtered view of the
contents of the defined databases, which does not show any Xindice documents but
only servers and collections. When the dialog is instantiated, the element that
gets automatically selected in the tree contained in the dialog is the
collection that is indicated in the Collection field in the Import Wizard, and
the tree is shown opened so as to reveal that selected collection. When the user
picks any collection in the tree widget, its absolute path is displayed just
above the tree widget itself in the dialog. The buttons above the tree widget
emulate navigation in a browser, allowing to "go into" a selected collection
(i.e. to display that selection as the root of the tree) or to "move out" of it and thereby enabling
the user to
bore in or out of a given hierarchy at any time.
When a directory is chosen as
the starting point in the file system, the interface fills in the boxes below
the "Directory" field. The box on the left contains all directories
displayed in a hierarchical tree, whereas the box on the right displays the
files contained in the selected directory. Figure
6
shows the wizard after selection of the source directory.
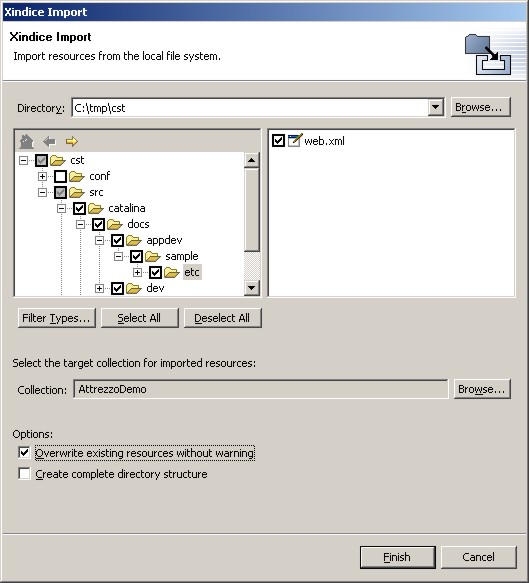
Figure
6: The Attrezzo Import Wizard filled in |
As can be seen, all
elements in the two boxes have checkboxes associated with them. Intelligent
management of the check/uncheck mechanism permits the definition of what is to
be imported at various levels. Checking a directory automatically checks all
files and subdirectories contained in it. The full path of the selection is also
shown via the greyed check boxes in the parents of the checked element (a grey
check box indicates partial selection of that element).
It is also possible to
filter file types via the "Filter Types..." button. This works in the
following way: first the user ticks the checkboxes of a set of files. She then
clicks on the "Filter Types..." button, which brings up a dialog of
possible file extensions. The user can pick a number of existing extensions or
define her own extensions if she needs it. When the "Ok" button is
pressed and the dialog is dismissed, the selection on the files will update
itself to show as selected only those files whose name has one of the selected
extensions.
Finally, it is
possible to select an entire file system tree or deselect it all using the
"Select All" and "Deselect All" buttons.
Two import options
are represented by the two checkboxes at the bottom of the Wizard page. The
first option enables the user to choose whether or not she wants to be warned
every time a resource with the same name and in the same relative location of a
selected file already exists in the database and is about to be overwritten.
The second option
enables the user to have the whole directory structure, starting from the root
directory shown in the Directory field at the top of the wizard page and down to
the selected files, to be automatically imported as well.
As in all wizards,
the "Finish" button is only enabled when the minimum amount of
information necessary to carry out the import operation is provided.
Furthermore, real time help, error messages and feedback are provided in the white area under
the title.
Any error
encountered during the import operation does not stop the operation itself,
which will run until an import attempt has been made on all files selected by
the user. All errors are recorded and a comprehensive error report is presented
to the user at operation completion.
Exporting
data from an Xindice repository
This functionality can be
accessed by either clicking on the "Export" button on the Attrezzo Navigator toolbar or selecting the "Export" menu item in the
"File" menu on the main menu bar. The wizard that is displayed is the one shown in figure
7.
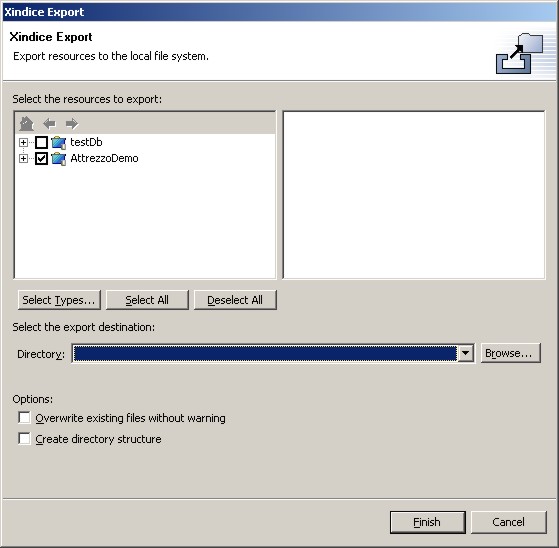
Figure
7: The Attrezzo Export Wizard initially |
When the wizard is
displayed, the left hand side box is immediately filled in with the
collections available on all defined Xindice servers (as displayed in the
Attrezzo Navigator). The navigational buttons at the top of the box enable the
user to bore in and out of specific portions of the tree. As for the import
functionality, all servers and collections are shown in the left hand side box
and all documents contained within the selected collection are shown in the
right hand side box. The Directory pull down field below the boxes is filled via
the "Browse" button which, when clicked, brings up a Directory dialog
as shown in figure 4. As for the import functionality,
the pull down field keeps memory of past selections.
Figure
8
shows the wizard after selection of the source collection and of the target
filesystem directory.
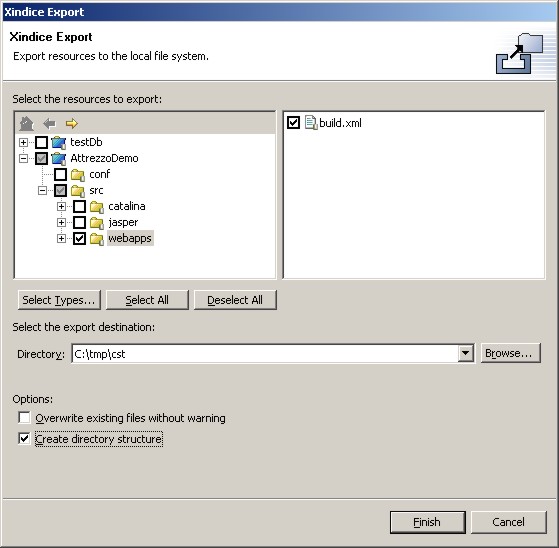
Figure
8: The Attrezzo Export Wizard filled in |
The check/uncheck
mechanism is the same as described in section Importing data into an Xindice
repository, as well as the behaviour of the three buttons "Select
Types...", "Select All" and "Deselect All" and the
meaning of the two options represented by the two checkboxes at the bottom of
the wizard page.
As in the case of
the Import Wizard, any error encountered during the export operation does not
stop the operation itself, which will run until an export attempt has been made
on all Xindice resources selected by the user. All errors are recorded and a
comprehensive error report is presented to the user at operation completion.
Manipulating
Xindice resources
Collections and
documents can be created from scratch and added to a specified Xindice
repository, modified or deleted from the repository.
Creating a new collection
The user can create a new
collection in one of the following four ways:
-
by selecting the "New
--> Collection" menu item in the context menu of the Attrezzo Navigator when either a server or a collection is selected;
-
by clicking on the
"New" Wizard;
-
by selecting the
"New" menu item in the "File" menu on the main menu bar;
-
by clicking on the "New
Collection" button on the main toolbar when an Xindice Perspective is
open.
The New Collection Wizard is
then presented as shown in figure 9.
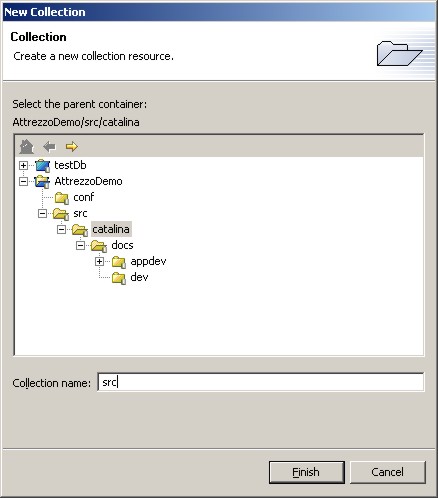
Figure
9: The New Collection Wizard |
The user needs to
select the parent collection (or server) in which the new collection will be
placed. This is done by selecting an item in the hierarchical tree shown in the
wizard. The buttons above the tree representation of the current servers'
contents allow to "go into" a selected collection (i.e. to display
that selection as the root of the tree) or "move out" of it, enabling
the user to
bore in or out of a given hierarchy at any time. The full path of the currently
selected element in the tree is shown as text just above the box containing the
tree gadget. The collection is created once the user presses the
"Finish" button. When this happens, the Attrezzo Navigator opens up to
show the newly added collection. Nested collections can be added in one go by
entering the collections names separated by "/". For instance, in
order to create the collection "catalina" and, within it, the
collection "docs", it is sufficient to select the parent collection, in
this case "AttrezzoDemo/src" and then to enter the string "catalina/docs"
in the Collection name field.
Creating a new document
The user can create a new
document in one of the following four ways:
-
by selecting the "New
--> Document" menu item in the context menu of the Attrezzo Navigator when a collection is selected;
-
by clicking on the
"New" Wizard;
-
by selecting the
"New" menu item in the "File" menu on the main menu bar;
-
by clicking on the "New
Document" button on the main toolbar when an Attrezzo Perspective is
open.
The New Document Wizard is then
presented as shown in figure 10.
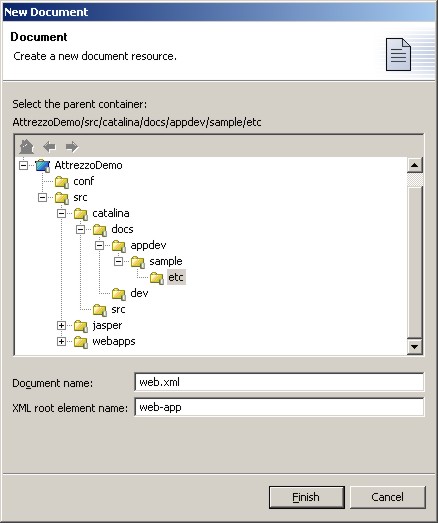
Figure
10: The New Document Wizard |
The user needs to
select the parent collection in which the new collection will be placed. This is
done by selecting an item in the hierarchical tree shown in the wizard. As is
the case for the New Collection Wizard, the buttons above the tree
representation of the current servers' contents allow to "go into"
(i.e. to display that selection as the root of the tree) a selected
collection or "move out" of it, enabling the user to bore in or out of a given hierarchy at
any time. The full path of the currently selected element in the tree is shown
as text just above the box containing the tree gadget. In order to create the
document the user needs to enter a name for the document in the Document name
field and the name of the XML root element in the XML root element name field. The document is created
once the user provides the needed data and presses the "Finish" button.
When this happens, the Attrezzo Navigator expands to show the newly added
document and, at the same time, an editor is opened with the newly created
document in its buffer. Only one document can be added at a time.
Editing a
document
An XML document
contained in the repository can be modified in the Editor window. The document
is opened by selecting it in the Attrezzo Navigator and then either double
clicking on it or selecting the "Open" menu item in the Navigator's
context menu. The document is opened in the Editor in its own tab. More than one
document can be opened simultaneously by making a multiple selection of
documents in the Attrezzo Navigator and clicking on the "Open" menu
item in the Navigator's context menu.
The Editor's
context menu offers several useful editing options. Among them, the
"Save" option enables storage of the modifications back into the
Xindice repository. Save can also be achieved using the appropriate menu item in
the "File" menu on the main menu bar or using the "<Ctrl>
S" shortcut. Finally, any given document can be saved with a different name
and/or in a different location in the hierarchical tree by using the "Save
As" menu item located in the "File menu.
When the user is
finished working with a document, she can close it by either clicking on the
"X" symbol on the document's Editor tab or by selecting the "Close" item
in the "File" menu on the main menu bar. All currently opened
documents can be closed simultaneously by selecting the "Close all"
menu item in the "File" menu.
Deleting
a collection or a document
Collections and
documents are deleted from an Xindice repository by selecting one or more
resource in the Attrezzo Navigator View and then either selecting the
"Delete" menu item in the Navigator's context menu or selecting the
"Delete" menu item in the "Edit" menu on the main toolbar.
Multiple resources can be deleted simultaneously. Deletions can also be
performed via the keyboard by pressing the "Delete" key.
When a collection
is deleted, all of its children are recursively deleted with it. If any document
that is due to be deleted happens to be open in the Editor, it is automatically
closed. Any unsaved changes in the Editor are automatically discarded.
|